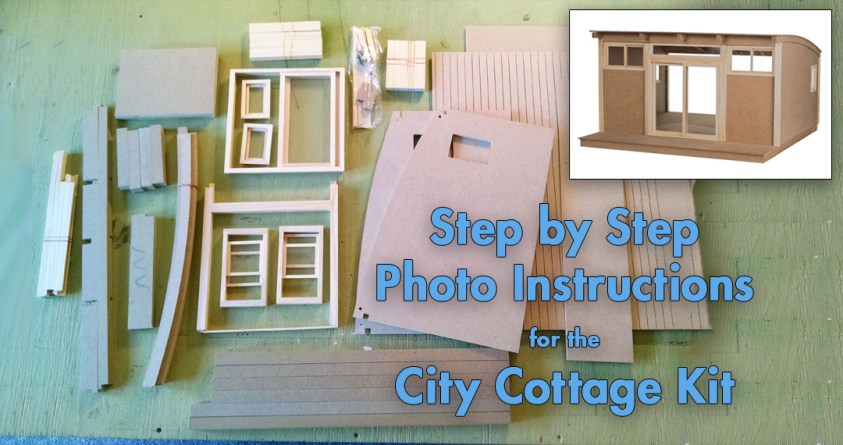


As the sequel to my Curved Roof Inspiration post, this month’s post is step by step instructions on how to assemble the limited edition Denise’s City Cottage Kit. By now I hope some of you have ordered your City Cottage Kit and are participating in the HBS/ miniatures.com Creatin Contest. The contest deadline is still far away in December, so even if you haven’t ordered yours yet, you’ve still got time to join the fun. Without further ado, the City Cottage Kit Instructions.
What’s in the Box:

While it is actually a really simple kit, the instructions come with a single picture, and that can present a challenge to some of us. I’ve included the original City Cottage Kit instructions, and as legal note, I do not own them. They are copyrighted HBS/miniatures.com 2014. My own notes, hints, and suggestions are in *italics*. Each of my images can be clicked on to bring up a larger version if you can’t see something in the thumbnail image.
As the instructions say, do a dry fit first without any glue. I decided to photograph each step as I did it, and then turn it into this easy guide for you. Here you can see everything included in the kit.
Seeing how everything is supposed to fit together might also help you figure out if your crazy-awesome kit bash idea will work. I had some ideas and after seeing it together, they won’t work out, but now I have new ideas!
Foundation:
Each piece has a smooth and rough side. Work the smooth side up for all pieces. *Be aware that there are 3 levels of smoothness. Check all sides to find the smoothest side.* Finished foundation is 19 3/4″ W x 20″ L.
Step 1. Arrange the longest pieces at the front and back, and two side pieces as shown and glue. Joints must be square. Use tape and/or clamps to hold until dry. (Tip: glue the two diagonally opposite corners first and let dry, then the final two.)
*Tip: Use Legos to make corners square!*
Step 2. Glue spacer/reinforcement pieces into corners, parallel to the longest pieces. Clamp or tape and let dry.
Step 3. Glue center supports to spacers and outer foundation. Clamp or tape and let dry.
Floor, Side Walls, and Beams:
Floor: Draw a pencil line 1/4″ in from outside edge on both sides of foundation. Place the main floor panel on the foundation, flush at the back and on the pencil lines. Use masking tape at the back edge to tack it in place.
*My image shows the house from the side so you can see that the floor isn’t flush with the sides of the foundation.*
Walls: Fit side wall panels into place with the countersunk screw holes *(they are at the top edge)* to the outside and the window openings to the back. Use temporary supports to keep side walls upright. Side walls will slightly overhang the foundation.
Beams: Carefully fit beams into notches in wall panels. Warning: Beams are somewhat fragile. The front beam has two shallow notches that face the interior to receive the door frame assembly. The rear beam is smaller and has a bevel on the top edge. The bevel supports the slope of the roof and fits flush where it meets the side walls. Use long strips of masking tape across the front and back to hold the side walls upright.
Roof Supports and Rafters:
Step 1. Fit rafters into the outer two notches on the Front and rear beams. Do not glue yet.
Step 2. Install roof supports between the side walls and the outer rafters starting with the four longer supports. Rear supports are angled to fit flush to the roof’s curve. Position the bevels up and flush with the walls and beam to support the roof. Glue to the beam only, not walls. Clamp and let dry.
*Without using any glue, I couldn’t get them to sit perfectly for my photo, but they fit well.*
Step 3. When the glue is completely dry, install screws through the predrilled holes on the side walls into the roof supports at each corner.
*There is a small baggie containing all the screws and small trim pieces and I didn’t open it up yet, but you will want to open it at this point.*
Step 4. Fit the center rafter in place and fit the shorter reinforcement supports between the center and side rafters, bevels up at the back and straight sides at the front. Glue supports to beam only; clamp and let dry.
Wait, Stop and Think:
Up to this point, the kit can be carefully disassembled for painting, decorating and wiring. If painting or papering, don’t forget the two front wall panels (MDF), which are installed vertically but otherwise are not specifically shaped for inside or out. When you are ready to proceed, use glue at all joints as you reassemble.
*You will want to continue with your dry run test fitting first before doing any gluing or painting. On your second time through the City Cottage kit instructions, this is a good time to do all the finishing work.**When painting MDF, you will get a much better paint job if you seal all the unfinished edges first. Make sure you mark which edges are being glued and do NOT seal those! I personally find wall spackling does a great job. Primer before you paint. MDF drinks up paint, and by sealing these edges, the dimensions stay truer, you use significantly less paint, and your finished paint job will be better. If you don’t want to bother with it, primer alone is still a good suggestion. I go into more detail about spackling and primer on my cabinet project post.*
Front:
Step 1. Fit preassembled wood frame for the sliding door unit into place from the outside by slipping the top tabs up behind the front beam and into the notches.
*I’ve included another image showing this step from the inside on my project’s Pinterest board.*
Step 2. Place front wall panels from the inside. To maintain disassembly capability, glue to the door frame only. Walls sit directly on the foundation.
Step 3. Install front windows flush to front wall from the inside. The windows are thicker than the wall panels and will slightly overhang on the inside. There is no trim or joining element. To maintain disassembly capability, glue to the front wall panel and door frame only.
*To prep the windows and sliding door for painting, you should disassemble them. Instead of disassembling, you could put blue painters tape down, but disassembling them will give you better results. Microwave each window pane for 5 seconds. This will soften the glue on the frame and you can remove an edge or two to remove the acrylic. If a few seconds isn’t enough, repeat until it is. Be careful, they will get hot!*
Porch: Floor sits on top of the foundation and against the front wall assembly. There is a slight overhand on the front and sides.
Trim Details:
Side windows: Open either out or in as you prefer. Trim pieces are provided.
*These side windows have a small brass nail that you need to remove before taking apart the window pane for painting. *
Front corner trim: The notched end goes at the bottom and fits over the porch floor, leaving a gap at the top.
*When painting the wall trim pieces, avoid painting the part that the glue will go on. This will help it hold better. Remember to paint all the visible edges!*
Trim for back opening: The angled end is at the top outside. Note: this trim is precisely cut for the thickness of the MDF wall; it may not fit over wallpaper without damage.
Rafter trim: Covers the screws on the outside. The square-cut end goes at the front. Small MDF blocks are provided to create the appearance of a full rafter at the front. Glue these to the rafter trim.
*These pieces are MDF and they should have their edges sealed prior to painting.*
Transom window: Install long trim, thin edge out, to the bottom of front beam and the short trims below on sides. Acrylic installs from the inside.
*As all the trim pieces and this window’s acrylic were in the small baggie, I wasn’t able to do this step for you.*
Sliding door: Pre-assembled unit flits into door frame from exterior. No interior trim provided.
Roof:
Install roof grooved-side up with the ungrooved area at the front.
Step 1. Locate eight predrilled nail holes near the front and back. Clear them with a pin or similar. Mark them on the top side so you can find them easily.
Step 2. From the inside, angle the notch of the temporary brace under the center of the beam and slide it to vertical. Temporary brace supports the rear beam while the nails are hammered in and can be removed after.
*You might want to reposition this brace to be directly underneath each nail as you hammer it in. It will provide better support that way.*
Step 3. Align roof along the back edge, covering the side wood trim pieces and centered so there is a slight overhang at the sides. Hold in position with tape at the rear.
Step 4. Using the tape at the rear as hinges, lift the panel away and apply a thin line of glue to the beams, rafters and side walls. Then gently lower into place, trying not to slide it out of position. Hold roof down at the front side/wall corners with tape.
Recheck position and nail, starting with the rear and checking the curve before moving on to the front. Clamp or weight until dry.
In Closing:
And that’s all there is to it! I hope you found my City Cottage Kit instructions useful and helpful. It really is a simple and fun little kit to put together. The contest is simple too! It only requires you to take four high-quality digital photos and upload them via their online form before December 16, 2015. Their winner will get a $1000 HBS gift card, first place gets a $500 HBS gift card, second place gets a $300 gift card, and third place gets a $200 gift card. Additionally, they guarantee that at least one gift card will go to a first time participant. Every participant will get a ‘thank you’ prize. What do you have to lose?