
So it’s been a while since I’ve posted about the Hobby Builder Supply Co Creatin’ Contest build. My last post was a set of photo instructions. Happily now though, I can give you the much anticipated status update. If you’ve been following along on my build’s Pinterest board, you might have noticed an influx of beachy imagery. Yes, that’s what I’m going for with this house. I’m going to do a lofted sleeping space, a small bathroom in the back behind the bed space, and on the other side a living room with a kitchen and an island in the back. We are making a dollhouse beach cottage!

About the same time I received my kit, I found out I’d be moving. With that in mind, I knew I shouldn’t get started on it yet. It would be much simpler to move while still in its box. I opened the box again and pulled everything out. Nothing was damaged, that’s a relief!
I quickly got started on building the foundation. I had decided to make a dollhouse beach cottage, so I’ll put pylons put underneath the house to elevate it. Not much has happened on that yet, except that I’ve bought 3/4″ round rods. I plan on weathering them with a steel wool / vinegar mixture. Since I’m running short on time, I set that part of the project aside until more of the house itself is done.
Windows and Trim:
I had requested a third sliding window and HBS sent it along. They were in the process of making the windows into stand-alone pieces, and they sent me one of the first ones. These have been redesigned to make it easy to remove the windows from the trim for easy painting. They come with trim for the inside and out. The exterior frame is slightly different from the one that comes in the kit, but as long as you aren’t putting it next to the kit one, you likely won’t even tell .
The next thing I tackled was taking the glass out of all the windows. I used the microwave trick and it does work, though sometimes you need to zap the piece a second time to really get the glue to give up on you.
With the glass out and the frames in pieces, I headed outside to primer them.
With all the trim pieces primed, next up was filling holes with spackling. This makes the finished paint job significantly smoother, and it eliminates all the ugly cracks.
I had picked up a glass door and a few extra windows at my club’s first annual tag sale. Since the grooved trim didn’t fit with the cottage’s trim style, I filled it in with spackling.
I also wanted a larger window in the kitchen. I hacked apart and glued together two of the windows.
After the spackling was dry, it was time to sand.
After sanding was another coat of primer, then sanding, then on to the first coat of my finish color, white! (So original, I know.)
Then a bit more sanding. So much sanding.
Once everything was sanded more or less smooth, I glued the windows back together. I’ll need to do a bit of paint touch up on them later, but that’s easy enough.
Back Door Plexi Fix:
Unfortunately, the plexi that came with the rummage-sale door had discolored over the years and it was just unusable. I didn’t have any plexi of that thickness on hand, so I improvised.
I cut two pieces of thinner plastic and a piece of translucent vellum paper. With the vellum between the sheets of plastic, I slid the sandwich into place, and it looked great!
Not only did it look awesome, but it also solved my problem of having to create a scene visible from the back door. Without being able to see out the back, I don’t have to put anything out there! Win-win.
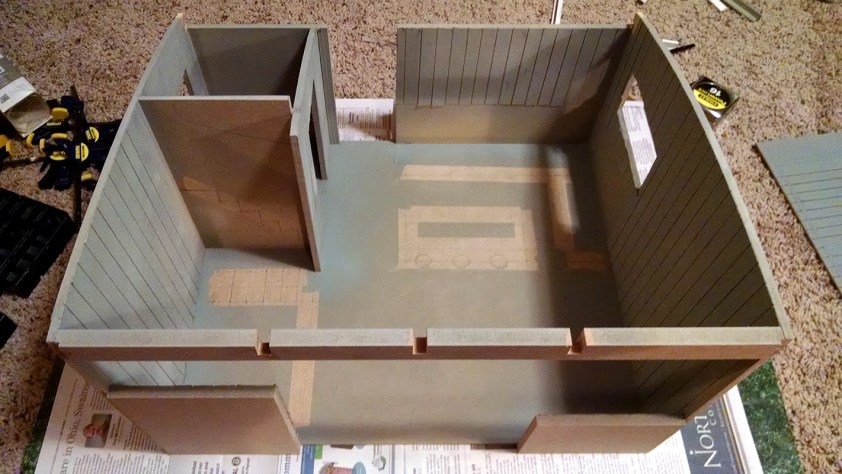
Putting Up the Walls:
I am adding in a back wall with a door and a bathroom. I also cut the front right side wall lower to accommodate the extra window. The bathroom was hard. I wanted to make sure the walls line up perfectly with the ceiling rafters above. I won’t be gluing the roof down, so getting them to line up separately is tricky.
Next up was the roof. Instead of putting the supporting rafters along the bottom and top like the instructions show, I spaced them out. I masked off where I would be gluing the rafters, as gluing over paint doesn’t hold as well, then I primed the ceiling. I liked the precut grooves (more wood panels!) so I painted that side instead after testing that the roof would flex in that direction.
Wood Panels:
I was inspired by a few beach houses that have wide white wood paneling inside. Some are vertical, and others are horizontal, and I chose to do the vertical ones. To do this, I found some thin cardstock, and cut it into strips.
Then I carefully glued these strips to the inside of the house. I tried to use a credit card to ensure the spacing was identical, but that didn’t work with the longer strips so I ended up just eyeballing it.
Kirie approves of this project. She is usually down here helping me with whatever I’m working on.

After all the strips were in place, I took it outside and primered it, then lightly sanded everything.
Next up was painting. I didn’t want to use the super bright white I used for the trim pieces. Beach white is a bit softer white. I poured a bit of cream into my pot of white and hoped I’d have enough to do everything. I took a course brush and by only painting along the direction of the strips, I painted a grain into my fake wood panels.

Fortunately, I did have enough paint to cover everything, and even got a second coat in! The first one wasn’t quite enough, but now the walls look nice and beachy fresh.
Ceiling and Rafters:
The ceiling needed to be the same shade of warm beach white as the walls. I had to work quickly. Again, by only painting in one direction, I painted a wood grain.
The curved rafters are cut from MDF, which has no wood grain. The short rafters are from a real wood, likely pine.
I wanted them all to look similar, so when I found a light birch veneer sticky paper at my local craft store, I knew I had my answer. I hadn’t decided yet if I wanted to stain my rafters, but with this real wood veneer, I have the option.
My mom was in town visiting me. She helped by cutting the veneer papers to the right shapes. The paper wasn’t long enough in the grain direction, so we divided up the rafter where the cross pieces would be connecting, to hide the seam.

After she had them cut, I carefully applied and trimmed them.
Once all the veneer was attached, I glued the curved rafters to the back support beam. I’m currently in the process of gluing the ceiling to the rafters. The curve requires I go slowly.
Next Steps:
I plan on cutting a bit out of the sides where the beam attaches so that the entire roof will hinge open from the back. After that the next step is gluing the intermediate rafters in place. There is still so much to do on our dollhouse beach cottage! I’m working on siding for the outside which I’ve got a lovely happy purple color for, then I have to create the loft sleeping space. I’m going to make a little staircase into a wall of drawers to get up to it. The kitchen cabinets all need to be made, and so do the built-ins in the living room. After all that I’ll still have to furnish and decorate! Eek!
Edit: Sadly, there will be no more posts regarding our little dollhouse beach cottage. During a move the walls were damaged. MDF doesn’t break cleanly. It bent and was unsalvageable, though I was able to save all the windows and doors and trim. 🙁 RIP dollhouse beach cottage.
If you liked any of the tools or supplies I was using and think they might be helpful in your own miniatures adventure, I have Amazon Affiliate links to them for you. As an Amazon Associate I earn from qualifying purchases. Should you choose to purchase any of these, at no additional cost to you, I may earn a commission. Know that I only recommend products, tools, services and learning resources I’ve personally used and believe are genuinely helpful, not because of the small commissions I make if you decide to purchase them. Most of all, I would never advocate for buying something that you can’t afford, don’t feel comfortable with, or that you’re not yet ready to use.