
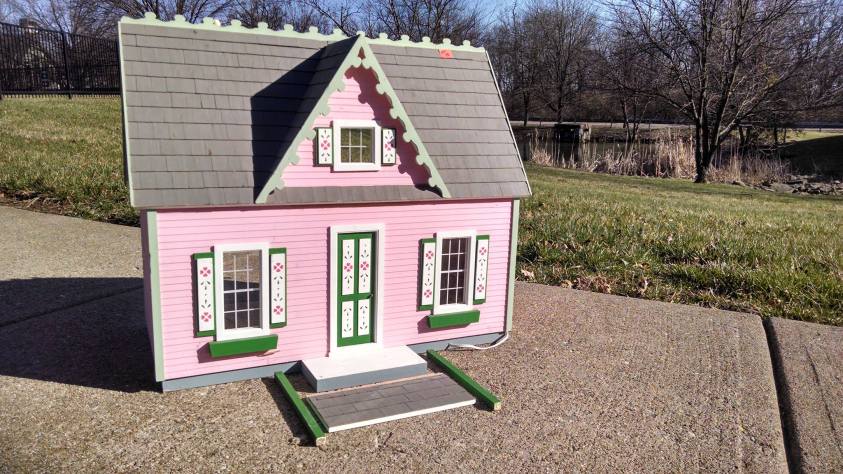


For my birthday I went to the local Goodwill and just by happenstance, a dollhouse was there. I knew I had to buy it, even if it was an ugly shade of pink and very fussily detailed. For $50 though, it was worth the price. The wallpaper inside *could NOT* have been uglier! (Actually, looking through the internet I’ve since discovered there are far far uglier dollhouses.) The pink in the living room was actually kind of nice, but I figured I’d redo everything while I was at it. Let’s get on with this dollhouse renovation!
I let my dolls have a walk through of the house before I started disassembling everything, and the Smalls agreed that with renovation, they’d very much like the house.

The first thing to do on my dollhouse renovation was to remove the barely glue in floor and then chisel off all the dead glue. I removed the bathroom tile floor easily as it just popped the plastic off, but removing the glue required a razor blade and LOTS of patience.

Next, I easily removed most of the molding and trim as well, I struggled with a few of them though and I had to pry them off. Most of them are basswood so they didn’t splinter or break on me. Sadly a few of them were balsa wood and those bite the dust.
After that, the wallpaper was next. The wallpaper was bubbling and just too ‘girly’ and not my style. It wasn’t that hard to tear off. In the process, some of the walls came down as well.
The rest of the wallpaper and glue I easily removed by soaking a paper towel in water then dabbing it over the area I was working with. A paint scrapper made quick work of the leftover paper and the glue.
To paint just the roof I protected the rest of the house with plastic bags and painters tape. The step was necessary because I was using textured spray paint.
Look how realistic the roof looks now! The textured spray paint really mimics the look of gravel shingles. I love it!
Lighter wood is just not my favorite. I stained the floors a darker color. I was going for a gorgeous dark walnut color. What I didn’t realize until after I applied it was that the floors weren’t actually wood. It was a painted technique on top of MDF.
Because the stain couldn’t soak into the wood, it actually took all evening, all night, and most of the next day to dry. I would have gotten a lot further if I hadn’t had to wait on the floors so long.
Luckily, I was able to paint the exterior a nice blue before it got too dark. I plan on doing white trim and maybe green accents. I’ll be removing the gingerbread later. I want a more realistic modern house when I’m done with my dollhouse renovation.
The next night when the floors were finally dry, I couldn’t resist putting my furniture in and seeing how it would all look. I bought the nursery set and the master bed on Saturday and couldn’t wait to play with my new toys!
Next I painted the walls. I like the green for the kitchen, but I think I might go darker for the living room. The upstairs is simply primered at this point. The nursery will be yellow, and the master bedroom will be the lighter cream you see in the living room. The bathroom will be tiles and white.
Moving the location of the stairs was a big decision for me. I wanted to free up the living room wall and take advantage of all the width of the upstairs, so bringing the stairs to the front seemed like the best solution.

Well, that’s all for now. I’ll make a second post when I do more work on my dollhouse renovation project.
If you liked any of the tools or supplies I was using and think they might be helpful in your own miniatures adventure, I have Amazon Affiliate links to them for you. As an Amazon Associate I earn from qualifying purchases. Should you choose to purchase any of these, at no additional cost to you, I may earn a commission. Know that I only recommend products, tools, services and learning resources I’ve personally used and believe are genuinely helpful, not because of the small commissions I make if you decide to purchase them. Most of all, I would never advocate for buying something that you can’t afford, don’t feel comfortable with, or that you’re not yet ready to use.


Additionally, I used Valspar Paint in the tiny testers for painting, you can get those at most Home Improvement stores in an infinite array of colors.
What primer did you use and what brand of paint did you use? Oil, latex or acrylic? How many coats did it take? Thank you! It’s a cute house!
Usually I use Valspar primer and paint. I use the sample paint pots you can get at any Home Improvement store. I figure if it’s good enough for real houses, it should work just fine for little ones too!So far on this project, I hadn’t used any primer. The previous paint was still in good shape and not a dark color so I painted right on top of it. The interior walls where I removed the wallpaper needed to be washed multiple times to get the glue off, and it only took two coats of paint. I imagine the upstairs might need to be primered because of the wood stain that got on the walls and the glued-on tile remnants.