

I’m so excited! Today is the first reveal day of the #DollhouseTherapy challenge! It’s a pretty simple challenge. Anyone can play along. You get one month to fix up one or two rooms in your dollhouse. On the last Tuesday of the month, you post pics of your rooms on either your blog or Instagram. The challenge runs for another two months. Get the full details over on Primitive & Proper. I’m starting off my Lundby makeover with the bathroom and bedroom.
I found a 1:18 scale Lundby dollhouse on Craigstlist for a steal at only $40. Even though I have plenty of regular 1:12 dollhouses in need of TLC, and my entire collection of miniatures is in 1:12 scale, the timing of the Craigslist find was just too perfect, just three days before my birthday! It was a sign. I’ve had my eye on these adorable little Lundby houses. Since they are Swedish, that makes them much harder to find in the U.S.A. A new one on Amazon sells for $100, but doesn’t come with any dolls, furniture, or a transformer. Plus, half the fun of a Lundby makeover is fixing up something old and ugly. Starting from a brand new one is kinda silly.

The lady selling the house was cleaning out her garage of her miniatures collection in preparation for moving. She had so many wonderful dollhouses! I wanted to take them all home with me! I gave her my card and she said she’d call me when she unburied more of her collection. She had mentioned that another person emailed her about the dollhouse. As I was the first one to enquire, the house was mine if I wanted it, and I did. It was perfect for my dream Lundby makeover.


Once I got home, I joined a Facebook group for Lundby collectors. I wanted to ask if any of the furniture that came with the house was rare or special. I didn’t want to paint over something I thought was ugly, in case I could have sold it for more and just bought something I liked better. As it turned out, the other Craigslist buyer was in the Facebook group I joined! She had her heart set on the bathroom set. She was planning to buy the entire lot just to get that rare Lundby bathroom! We chatted a bit, and I agreed to come visit her in a day or so to trade the bathroom set.

In the meantime, I got my Lundby makeover started. I got out my Prismacolor pencils and started coloring the bricks on the outside wallpaper. The paper had discolored in a few places, and I wanted to make the bricks stand out a bit more. I colored the mortar white and did a blend of golden and brown squiggles on every single brick. It took me the better part of two evenings, but I’m very happy with it now.
I also painted the brown trim to a nice clean white like the modern Lundby houses have. The ceiling was a dingy color, so I painted that as well. The hardest part was painting the stairs and not getting paint on the window plexiglass.


Next was my visit to my new Facebook friend. She has a fantastic collection! A dozen or so houses, and her goal is to have one of everything Lundby has produced. It’s quite a goal, but she is well on her way. We sorted through her collection. She let me have a few items that were broken which I know how to repair, some drop-dead gorgeous lamps, an accidental duplicate purchase, and a more modern bathroom set to replace the blue set she wanted. (Gotta have a bathroom, right?) I also gave her a few other pieces that I didn’t want, and I left the lower level with her. The trim was missing, and honestly, I don’t need that big of a dollhouse. Famous last words, right? So far so good.
Once home, I started playing around with the furniture trying to figure out the room setup for my Lundby makeover. I quickly realized I needed to purchase a new living room set. I had left the blue set that came with the house with my new Lundby friend. Unfortunately, I didn’t get a replacement for it in trade. On Etsy, I had seen some super cute TOMY entertainment units, I knew I just had to get them. I found an adorable pink Lundby living room set sold by a U.S. company. Most items are in Austrailia or the UK, so shipping is a real problem. I ordered it and the TOMY items, and they arrived in a few days. I’ll save those pictures for the proper update, as this Lundby makeover post is about the bathroom and bedroom.
Next, I started picking out new wallpaper and floors for the house. I have a bunch of scrapbooking paper. I wanted to get rid of the gold motif that every room in this 70’s house has. It needs more blue. Well, they did put blue down as a floor, but I’ve never seen a bright blue floor anywhere. That will have to get covered up too. I got the bathroom walls done and then I tackled the bedroom.
The upper floors have a slanted ceiling, so getting the wallpaper angles right is a nightmare. I used tracing paper, but I still didn’t get it quite right. I decided to cover it up with crown molding later. Doing the paper around the door and window trim is also not so fun. I hate seeing edges. I made sure the paper was just barely larger so it could slide underneath the trimwork. Very precise cutting and measuring required. Once I had the bathroom and bedroom wallpaper measured, my willpower to continue with the rest of those ridiculous walls left me. I realized that’s what next month is for anyways, so I stopped. I just have to do these two rooms, I can do this. Not the whole world, just three of them.
Something always bugged me about the Lundby bathroom. It is crazy deep. Like, big enough for a child’s bedroom. I could put the sink and the toilet and the tub and the standing shower in there and make it all look like it belongs, but there is just still so much space. I started playing around with the idea of bringing the sink and shower closer to the front and just not using the whole length of the room. It started to look better. I’ll have to make a fake wall to shrink the room.

With the general shape of the rooms coming together in my Lundby makeover, it was time to do repairs and repaints on the old furniture. The white bookcases were looking pretty shabby and I didn’t care much for the light wood color of the bedroom set. Everything that was already white got a fresh coat, and as luck would have it, the white ended up matching pretty perfectly. What’s the big deal, white is white, right? Wrong, we have white, off-white, eggshell, ecru, ivory, chalk, milk…
I am going for a hip fun look, so white, and to some extent, black will be prominently featured in my house. The best white for decorating isn’t the brightest white, but rather a warmer white, and likewise, the blackest black is not what you want either. The black I have is about the same color as an old chalkboard.
I painted the bed and the nightstand in that color. Since I had the paint out, I did the kitchen table in a white top with black legs as well, and painted one of the little red chairs in my black. The dressing table needed a chair, and I thought it would look cute. Originally the chairs were meant to go with the table, but one of them is missing a leg. I realized that the tiny little chairs I had bought in Copenhagen a few years back are the same scale, I quickly found them and installed them as the new kitchen chairs. I’ll tell you more about them next month when I do the kitchen. 😉
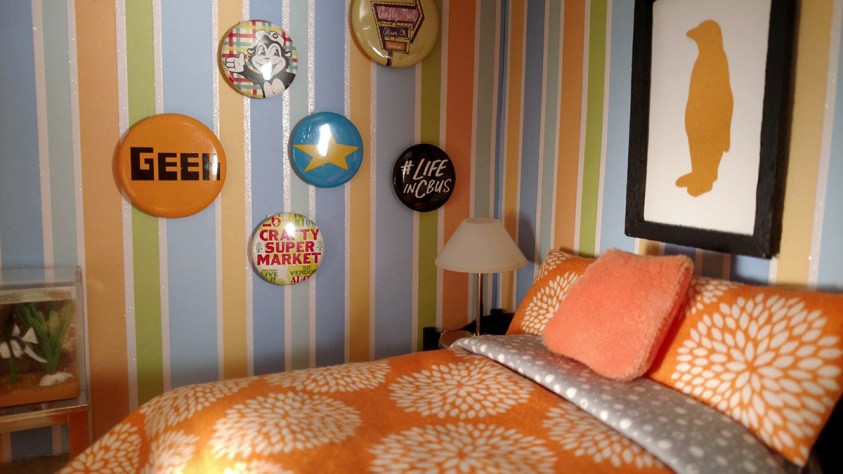
Once the bed was dry, I decided to see if my 1:12 bedding would work. While the comforter looks a tad long, I think it works. The blue striped walls go perfectly with the orange bedspread. I had to duct tape the fitted sheet to the mattress because it was so big, but it works. I use double-sided tape to hold the bedding down. Some people starch their bedding, but I like the ability to take the bedding off and put a doll down for a nap under the covers. The pillows were also a tad large, but that’s not so out of scale considering the giant pillows that are in fashion these days. I found a smaller orange pillow and put that on the bed as well.
Before I lost access to the rest of the bathroom with this crazy fake wall idea, I taped down a piece of one of my new tile Wallpaper Printables. Turns out in this scale, 2″ 1:12 scale tiles work as 3″ tiles, so I was in luck and didn’t need to do any scaling. I printed the tiles and while I was at it I grabbed some for the kitchen as well. I also printed off a sheet of my beadboard wallpapers and just cut the borders down a bit.
Once the new floor was in place I needed to make a fake wall for the back. I have tons of scrap wood down in the basement and it didn’t take much to find a decent piece that was just barely bigger than I needed it to be. I cut it to size and glued a bottom to it so it could stand on its own, put another piece of matching bathroom wallpaper on it and wedged it into place. Somewhere in this shuffle I decided I didn’t need the stand up shower, and liked the bathroom even smaller, so I didn’t push the new wall very far back at all, and turned the tub on the now shortest wall.
With all the large pieces in place, it was time to decorate! I started by hauling out one of my minis containers and went through the entire thing looking for anything and everything that might look cute in any of my rooms. The first thing I found was a hand towel in exactly the right color for the bathroom, and some tiny sea shells. I also found a blue wine bottle that looks like a shampoo bottle or a bubble bath bottle. The bathroom needed a mirror, and I have a bunch of tiny round mirrors that I use for my craft fair booth displays. I won’t miss one of these smaller ones, and round mirrors are so cute!
The last thing the bathroom needed was a shower curtain. I have some malleable wire from some long ago project, and bent it into the shape of a shower rod. To attach it, I drilled two small holes in the backsplash of the tub and the wire fit snug. I won’t even need to glue it, which is great, because then later I can change out the curtain if I want. For the curtain itself, I dug through my fabric collection and found a very sheer wispy scrap of white. Perfect! Unfortunately, I couldn’t find grommets in my stash that were small enough, but I kinda stopped caring at that point, I was on a roll! I love how the bathroom looks, everything is so cute!


The bedroom also needed a curtain and a curtain rod. Once again, the wire was perfect, and even fit in the existing window holes perfectly! I tried a few other fabrics before settling on the white in the picture. It’s not my favorite, but done is better than perfect in this Lundby makeover.
The slanting back wall was just begging to have art featured all over it, and I have these adorable buttons that I get from my local craft shows. My alma mater‘s Crafty Supermarket is at the bottom and Akron’s Crafty Mart is at the top. My current town’s Craftin’ Outlaws will go in a different room, but #LifeInCBus is up there repping my latest Ohio adventure. The blue star pin in the center is actually from my American Girl Magazine days and somehow I haven’t lost it yet in two decades. The size of these buttons is perfect for the space and the art is adorable. I used some pliers to smash their pin backs flat, and then stuck them to the wall with scrapbooking tape. I’ll be able to take them off and rearrange them if I want to later, without harming the striped wallpaper.
The last little thing I needed for this room was a bit of art over the bed. While looking for my pin collections, I found an adorable yellow temporary tattoo of a penguin I had gotten in a swag bag. I stuck it to a bit of shiny paper and cut some bits of wood to be the frame. I glued them together and painted them in my accent black. I’m not sure if it’s going to remain as the only art above the bed, but it’s good enough for now.

I just love everything!! Seriously, how cute is it all?! Gah!! <dies of cuteness overload>
What was your favorite part of this Lundby makeover? Let me know in the comments!

Next month for the #DollhouseTherapy Challenge, we are tackling the kitchen and the entry hall!
If you liked any of the tools or supplies I was using and think they might be helpful in your own miniatures adventure, I have Amazon Affiliate links to them for you. As an Amazon Associate I earn from qualifying purchases. Should you choose to purchase any of these, at no additional cost to you, I may earn a commission. Know that I only recommend products, tools, services and learning resources I’ve personally used and believe are genuinely helpful, not because of the small commissions I make if you decide to purchase them. Most of all, I would never advocate for buying something that you can’t afford, don’t feel comfortable with, or that you’re not yet ready to use.


That bathroom is so cute! Love the pink tile. The button art is such a fun idea too!
I’m glad you like the pink tile. I had been toying with the idea of painting over it, but then just ran out of time. Looking at it more now, I think I like it the way it is too.
Lundby houses are so cute! I love the pin art. Especially the geek one. The bathroom is so serene. Love the color choice.
The geek button is my favorite too! When I saw it pinned to my favorite purse I struggled with taking it off or leaving it on. Thankfully, a quick look inside the purse revealed I had bought a second one for the day when the first one gets lost. Now I have it in both places!
It’s so cute! That bathroom is so cute. I just love the tiny soap dish!
Such a hard work! I would not have had the patience to teach a dollhouse so realistic. In addition, the design of these rooms is much more beautiful than my own apartment.